

Problem Framing v2: Part 4 of 4
In Part 1 of this series on problem framing, we covered Step 1 of 5 — Problem Discovery.
In Part 2 was Step 2 — Business Context.
In Part 3 was Step 3 — User Perspective.
Head’s up! We just launched our brand new Problem Framing Toolkit— a comprehensive kit containing all of our training and do-it-yourself tools&templates to equip you to facilitate your own problem framing workshop!
In this final article of the series, we’re going to first walk through Step 4, where we’ll find the opportunities that exist between business and user.
And finally, we’ll use Step 5 to reframe our original problem into a clear, actionable problem statement — a perfect input for a design sprint, or any other solution prototyping process.
Step 4: Business-to-User Mapping
[Time allocated: 75 mins]
If you remember, in Part 2 of this series, I said:
“There are 2 customers we need to consider during any sort of product discovery work (research, framing, sprints, etc): your business / company and your user.”
Step 4 allows you to visualize both customers on a single grid.
The goal is to combine the user data from the Experience Map you created in Step 3, with the SWOT (company) data you collected during Step 2.
By bringing this data together, it will drive relevant, comprehensive discussions between your team about the points in the current experience where your users struggle but your company possesses strengths and opportunities.
Likewise, you’ll see where users are currently satisfied and/or your company is outgunned (lots of weaknesses and threats) — the areas you may want to avoid at the moment.
Expand your map
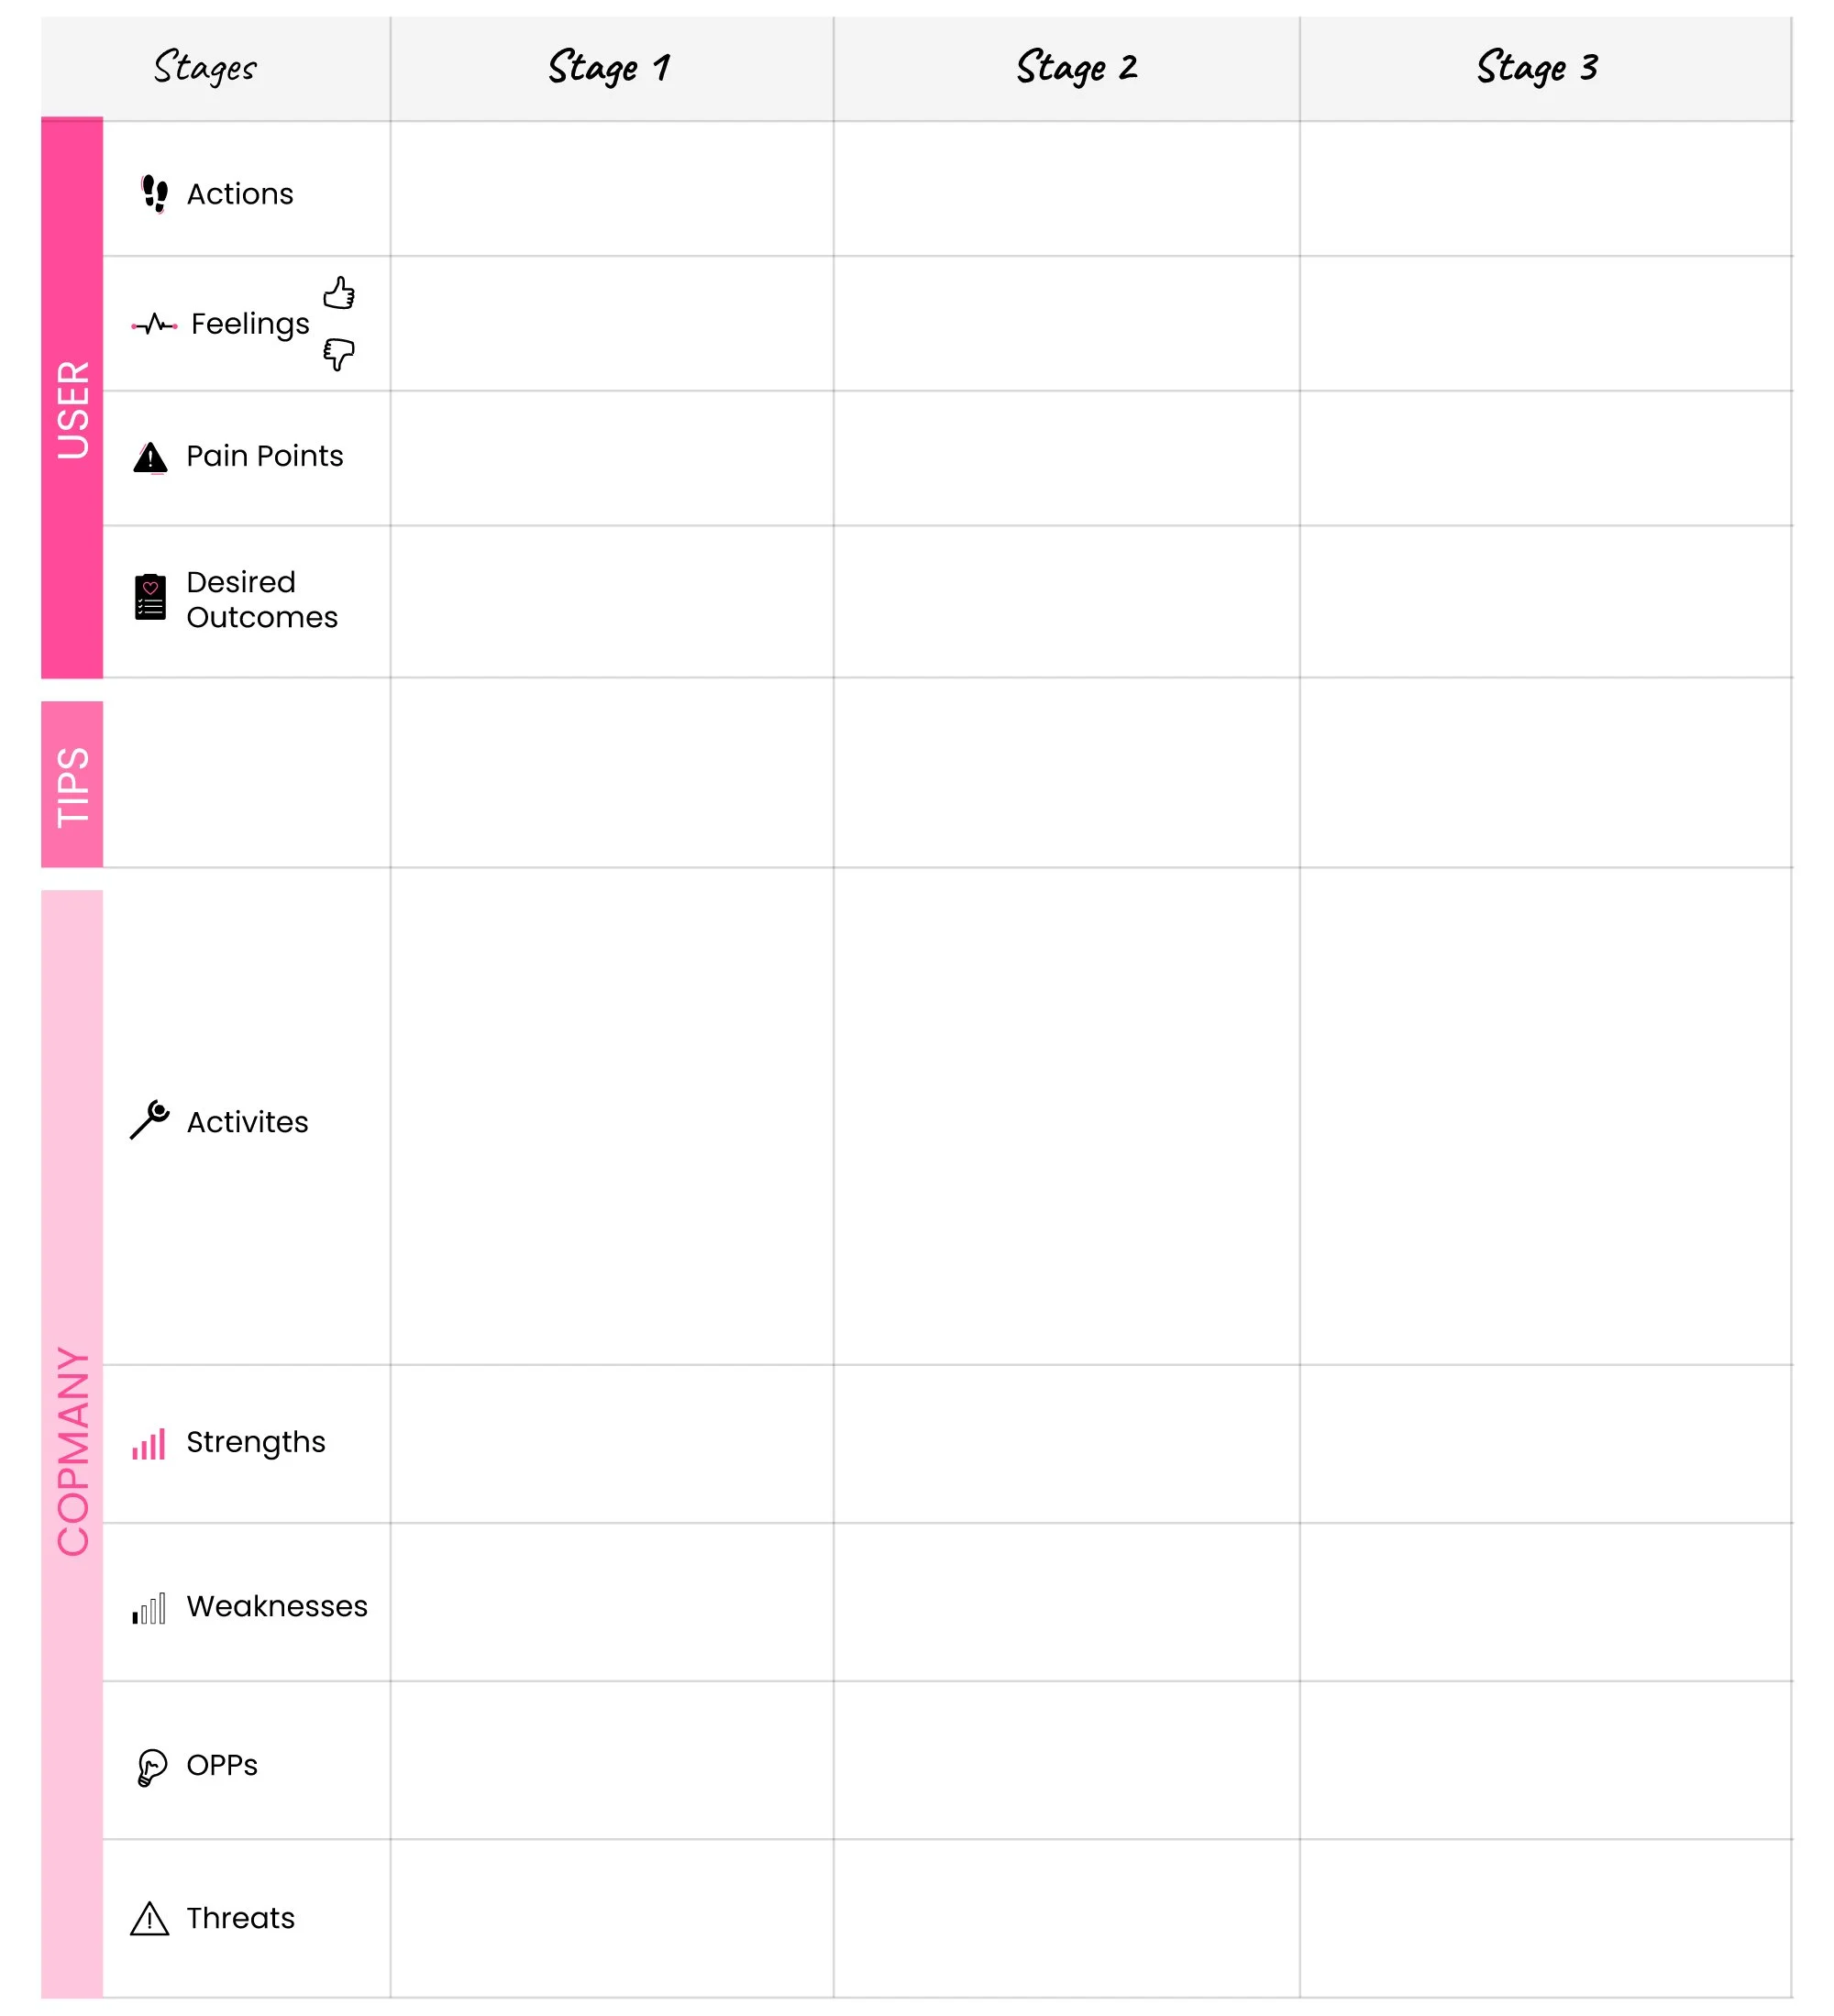
In order to perform step 4, you’ll first need to expand your Experience Map below the User section to include a section dedicated to your Company. It should include: Activities, Strengths, Weaknesses, Opportunities, Threats.
Then, you’ll add a row in between the User and Company sections labeled Touchpoints.
It will now look something like this.
Note: We use Mural for visual exercises like mapping, which is what you see in this example and those that follow.
And now onto the 4 exercises that make up step 4.
1. Brainstorm company activities
Work together to brainstorm all of the activities your company is involved in at each stage. These are activities the company is currently taking to somehow impact the user’s corresponding journey.

Extend your Experience Map to include Company data points and then complete the Activities section.
2. Move SWOT data to the Experience Map
During Step 2 (Business Context) your team brainstormed the strengths, weaknesses, opportunities, and threats. You captured that data in a 2x2 grid. Now, working in 1 quadrant at a time, grab each sticky from the 2x2 and place it on the map within the corresponding stage.

Move stickies from your SWOT 2x2 to the corresponding intersection of your Experience Map.
3. Touchpoints between user and company
Using the touchpoint row, for each stage your team should brainstorm the interactions that currently exist between the two.
4. HMWs to find the biggest pain points / opportunities
Since the most impactful and most desired solutions will come from areas where the biggest current gaps and challenges exist, you need a way to discover the future opportunities that are currently buried within existing pains. Just like their use within a design sprint, How Might We’s are a great tool for such a job.
First, your team will diverge. Each will review the map and consider all of the problems, challenges, and pains that exist for your user. You’ll turn them into opportunities by asking How Might We solve that. Write down as many HMWs as you can come up. Then, pick your top 2 and stick them on the map — you can place them next to specific actions, feelings, etc, or (if they’re related to an entire set) leave them near that stage.
Then, your team will converge to vote on the top HMWs.
You now have a visually apparent indication of the most opportune (AKA problem-ridden) space within the current experience that you should focus your solutions on.

Your team uses HMWs + voting to find the biggest areas of opportunity (biggest current problems).
And with this step completed, it’s finally time to formulate your reframed problem statement.
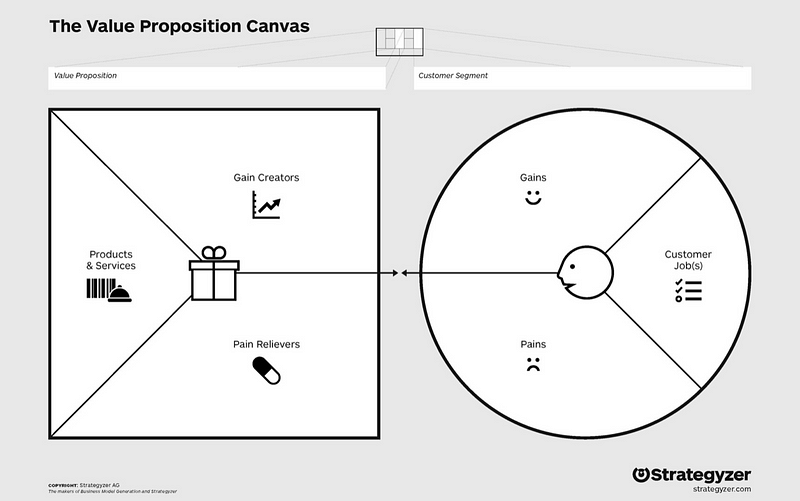
Step 4 alternative: Value Proposition Canvas
We think one potentially alternative approach to the expanded experience map is to go through the steps of completing a Value Proposition Canvas.
Since we’ve never used this approach ourselves within a framing session, I’m not going to go into more detail but I’d love to hear if others have had success with it.
Step 5: Problem reframing
[Time allocated: 30 mins]
The good news is that you’ve already done most of the hard work. Your team has the information they need to reframe your problem statement; it’s just a matter of formatting it to be clear and cover the important pieces every good problem statement deserves.
Wait, why are we doing all of this again?
One of the biggest reasons my team realized the need for framing is the simple fact that everyone thinks and communicates differently. That surfaced for us on day 1 of our design sprints when 7 people were talking about the problem 10 different ways.
But wait, there’s more.
As much as we’d like to believe that the team you’re working with will wrap up framing and move directly to solution mode tomorrow, the odds are against you.
There will likely be gaps in between, new stakeholders to appease, existing team members leaving to work on other fires, and new team members joining to bring their expertise.
And since change, confusion, and bias are momentum killers, we use framing to make sure our problem is clear and actionable. We do so with a 4-part problem statement.
The 4 parts of a problem statement
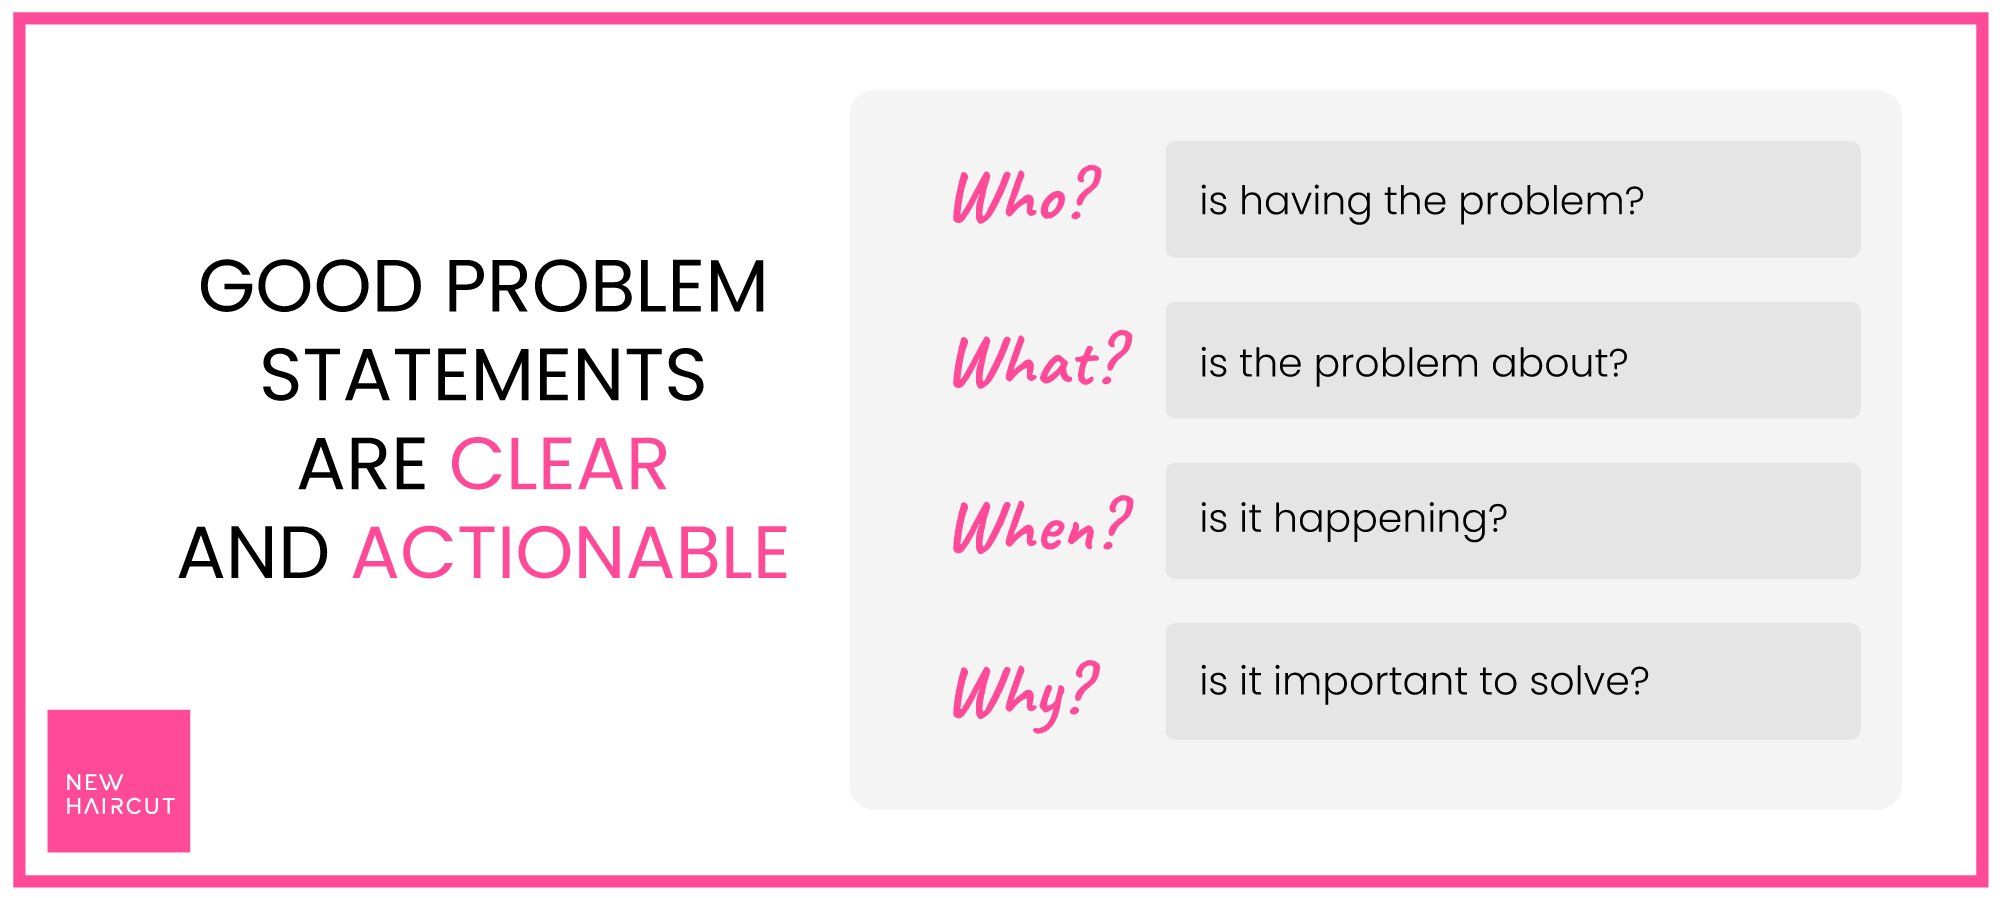
A good, complete problem statement will tell you 4 things:
Who is having the problem?
What is the problem about?
When is it happening; aka what is the context?
Why is it important to solve; aka why will we / our users care?
Additionally, problem statements are:
Brief — People are lazy, so be short and sweet
Factual — Use the data you just assembled; avoid inventing new info
Unbiased —Look at all of the information you have with an open, honest mind
KPI-less — Real solutions solve real problems; KPIs and metrics tend to obfuscate what really matters (additionally fostering Outcome bias)
Rooted — When we jump to conclusions or solutions we often solve the symptoms, while real problem statements focus on the root cause
Forming your problem statement
Finally, you’re ready to write up your problem statement.
Following the guidelines noted directly above, there are just 2 exercises remaining.
Using the top-voted HMW from your experience map, each team member individually writes their problem statements. Afterward, everyone shares with the team.
Now work together to either select / vote on the best statement from the group, or mix and match to find the best combo.
You should now have a reframed problem statement that’s clear and actionable. This, and the information you used and gathered to run this session, are the foundation you want to build upon.
Wrapping up
A couple closing thoughts.
A word to the wise
In parting, I want to make sure I haven’t overhyped framing.
As I hope you’ve learned during this series, a single problem framing session is, in fact, a 1-day process with a handful of sequential steps. There is a beginning, middle, and end. However, framing within the larger context of product design, is rarely a 1-time event. Same goes for researching, prototyping, designing, building, testing.
Nothing about creating a product is linear. All of it is iterative and imperfect.
Progress and insights from 1 step have a funny way of changing what you thought you knew — sometimes sending you back to the beginning, but a bit smarter this time around.
That’s why most of the more accurate product cycle visuals have lots of circles, infinity loops, and arrows pointing in 3 different directions.
The best teams account for all of this by balancing the speed and momentum of these fast-paced discovery workshops, with a continually curious mindset.
For more evolved thoughts on this, check out Teresa Torres’ POV in 6 Guiding Principles for Effective Product Discovery.
The sake of learning
As a closing to this article and series, I started to write up different paths you might consider after framing, but I stopped. Instead, I’m going to let this series breathe a bit… To give you and your team a chance to test things out on your own.
The methods shared in this series have been pieced together through countless hours of hard work, experimentation, failure, and retuning.
But there are plenty of times I’m applying any 1 of our processes or tools (framing included) and feel that things aren’t quite right. Sometimes they’re entirely wrong for a particular scenario and I have to stop and go back, or ask others for advice. But better to begin than to wait for perfection to land in our laps. We’d be waiting a long time.
So with that just 1 final request I have — as you start to try some or all of the ideas in this series, I need to hear from you — the good, the bad.
Notice I didn’t say “I’d love to hear from you” — then I wouldn’t have meant it.
Play nice and share. That way I can learn too, which will make these posts better and more informed.
Completely updated tools & process (as of 2020)
