Problem Framing v2: Part 3 of 4
In Part 1 of this series on problem framing, we covered Step 1 of 5 — Problem Discovery.
In Part 2 was Step 2 — Business Context.
In this article, we’re going to walk through Step 3 by getting familiar with the overall user experience surrounding this problem.
Head’s up! We just launched our brand new Problem Framing Toolkit — a comprehensive kit containing all of our training and do-it-yourself tools&templates to equip you to facilitate your own problem framing workshop!
Step 3: User Perspective
[Time allocated: 90 mins]
Over the last decade, companies wanting to transform their ability to consistently launch successful products and services have realized the benefits of becoming a design-driven culture.
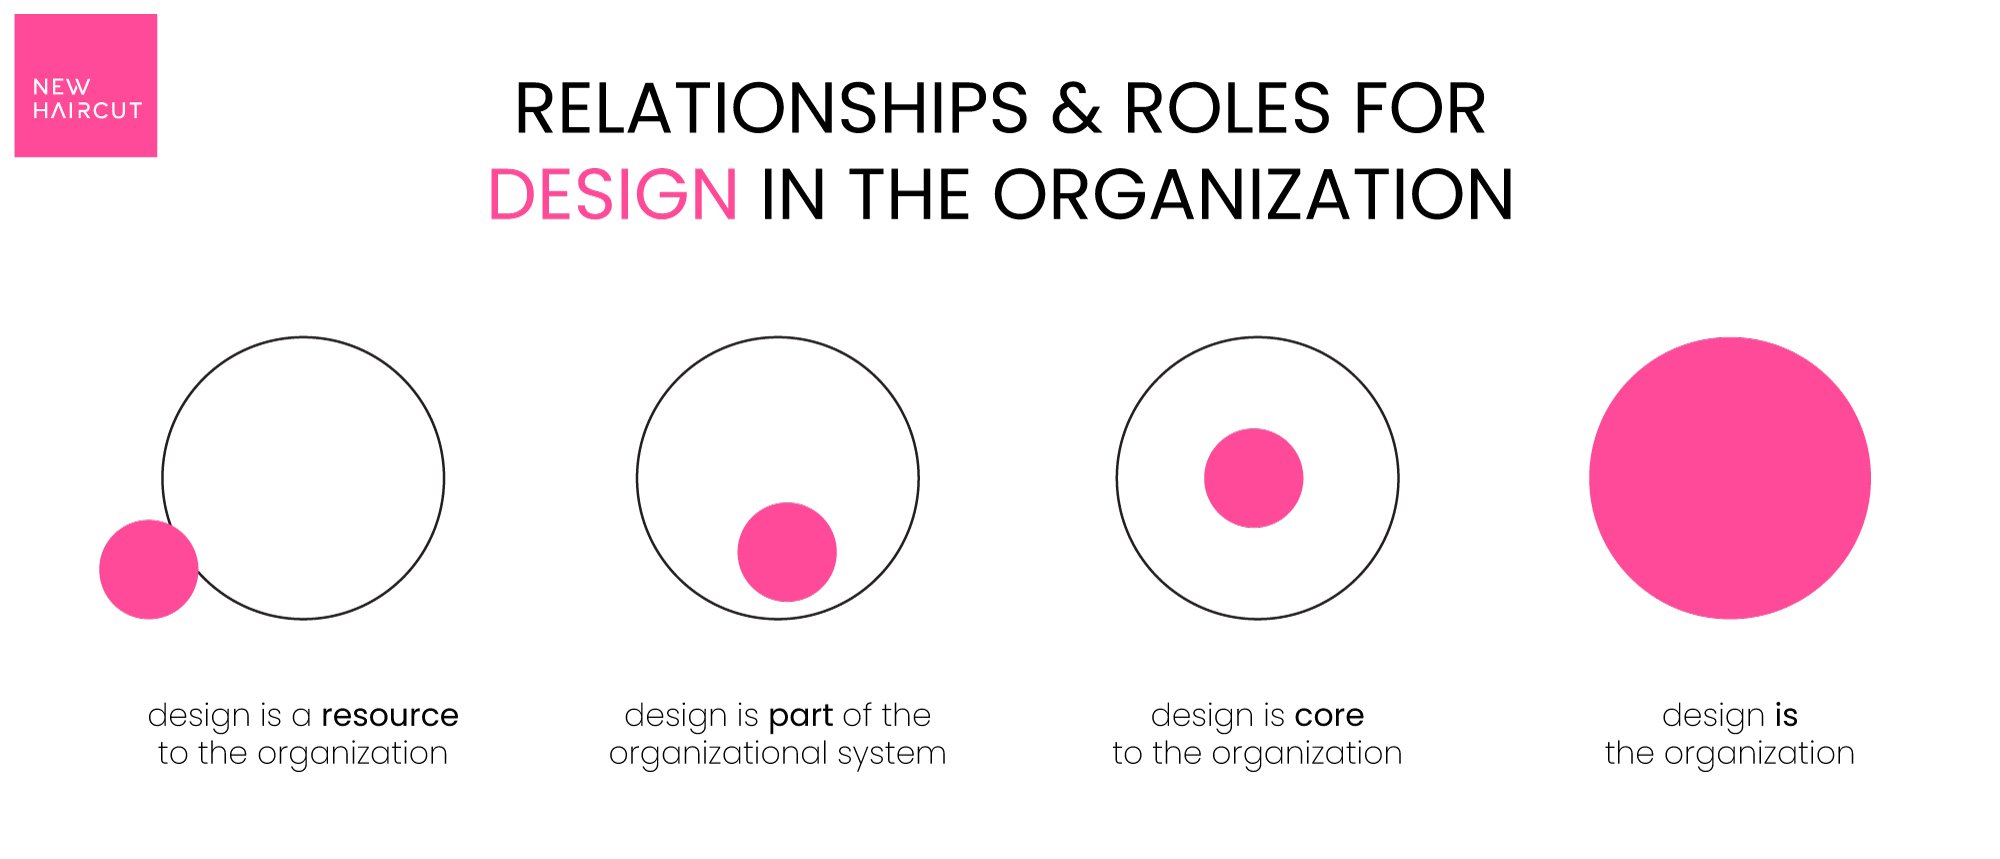
By putting design at the core, we enable our teams to develop an empathic mindset so that the products and services they develop keep the user front-and-center.
Sabine Junginger captured this changing relationship between design and the surrounding organization in a simple yet perfect visualization.
This evolution in thinking, and the associated user-centered exercises that follow, are the crux of Step 3.
Within this step, there are 2 guiding questions you need to answer:
Who is experiencing the problem?
What does their experience look like?
Let’s answer 1 at a time.
Who has the problem?
If you’re a new company, some homework that you’ll need to do prior to framing is to develop your user personas and/or segments.
For more established companies, you should have the means to invite the related expertise into the room in order to create those artifacts during this session. Otherwise, your homework will be to refresh your user data with a light round (1 day) of qualitative research.
Whichever path you took to curate or develop your baseline user data, the next exercise (and it’s alternatives) is designed to rapidly update & align everyone on who your user is.
1. Proto-persona: While there are typically several users facing the problem, the proto-persona is the one most impacted by it.
As a team, you’ll brainstorm this user’s Facts, Problems, Behaviors, and Goals. This simple, visual group exercise allows the team to be (re)introduced to your main actor.
The Facts, Problems, Behaviors, & Goals of a proto-persona help to build user empathy.
2. (alternative) Job to be Done: Clayton Christensen of Harvard developed the jobs theory in order to allow researchers and designers to build empathy for their users through a different lens — by understanding the job users hire our products and services for to relieve the associated pain they’re experiencing. If you plan on using this framework, here’s a complementary JTBD interview script to use. I also highly recommend you follow the ideas shared by Alan Klement.
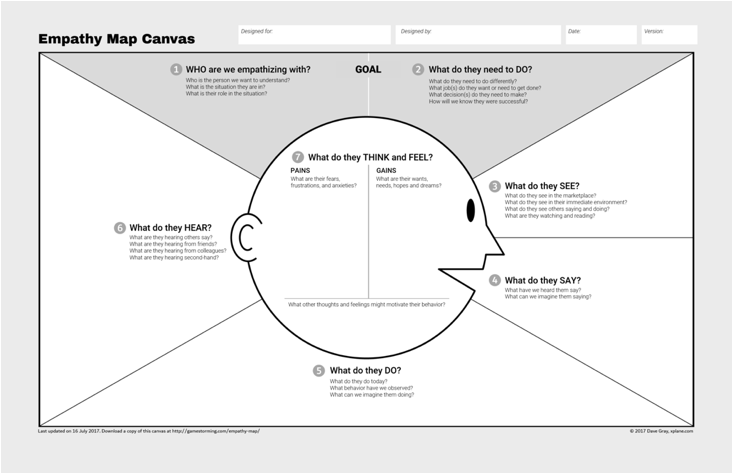
3. (alternative) Empathy Map: Similar to a proto-persona, an empathy map helps to bring direct context of our user. In its most updated version, your team will brainstorm together to answer questions about your user’s goal, their external environment, and their internal environment (in that order).
Goals: Who are we empathizing with? What do they need to do?
Internal: What is your user is hearing, seeing, doing, and saying?
External: What is your user thinking and feeling: segmented by pains & gains.

Now that your team has a better understanding of who your user is, you’ll next become more familiar with their experience navigating through this problem.
What does their experience look like?
The term User Experience is thrown around a lot today. Most talk about it interchangeably with interface design — phrases like UX/UI don’t help.
And while it’s true that more and more of our experiences with products and services are being digitized, there are many parts of those experiences that have little to do with an interface or technology.
Rather, a human-centered user experience is the complete story of actions a person takes, the feelings they face, the pain they undergo, and the outcomes they wish for as they navigate their journey. The journey begins at the realization of their problem, until the point they’ve reached their goal — today’s existing solution(s), if any.
It’s worth repeating here and fairly obvious — but for many problems that are actually worth solving, their already exists some form of a solution that’s good enough. However for some problems, there are either no solutions, or solutions that users would welcome a better option. These latter problems are the ones that present the most opportunity for us to work on.
In your problem framing session, the tool you’ll use to brainstorm and capture your user’s (proto-persona’s) experience is an Experience Map.
Experience Maps visualize the actions, feelings, pain points, and desired outcomes that users experience along their journey — from initially experiencing a problem until they’re reached their end (goal) state.
Step 1: Brainstorm the various stages your user goes through — don’t spend too much time on these just yet, as they’ll likely change / merge / separate as you continue with the subsequent steps.
Step 2: List out the actions your user takes during the first stage only.
Step 3: List out the feelings your user takes during the first stage.
Step 4: List out the pain points your user takes during the first stage.
Step 5: List out the desired outcomes your user takes during the first stage.
Next: Move to Stage 2, 3, etc, repeating Steps 2–5 above for each stage. At the end, make sure you all still agree on the stages.
Note: For more on mapping and why we do it within framing (vs. a design sprint), I highly recommend reading What happens before a design sprint v2. You can also take it a step further by reading Jim Kalbach’s, Mapping Experiences.
[embed]https://www.newhaircut.com/resource-library/what-happens-before-a-design-sprint-v2[/embed]
Wrapping up User Perspective
Previously, in Step 2, we learned about the impact the business would encounter by solving this problem.
Now, in Step 3, we’ve aligned on who your user is and what their experience is like.
Next, in Step 4, we’ll marry the business and user experiences to find the most opportune spot to innovate and create new solutions.
PART 4 NEXT: To end this series on problem framing, we’ll cover the final 2 steps: Business-to-User Mapping and Problem Reframing.
Completely updated tools & process (as of 2020)


